About the Congrea Presenter Manual
About the Manual
This manual has been designed to explain the user interface of Congrea from a Presenter’s perspective as well as how to use its different features.
Disclaimer
All the information stated in this manual is subject to change without any prior notice. Vidya Mantra EduSystems Pvt. Ltd. reserves all the rights to modify the publication and content anytime without notice to any person. Vidya Mantra EduSystems Pvt. Ltd. does not provide any statement or warranty on the content of this manual.
Copyright
All Rights Reserved © 2018 Congrea. No duplication of this user manual is allowed without the written consent of Vidya Mantra EduSystems Pvt. Ltd.
Introduction
Congrea is a new generation scalable, open source online virtual classroom environment. It has been packaged with several value added features such as, audio-video interaction, chat, poll, quiz, collaborative editor and much more. Congrea also enhances the user experience by allowing the users to share media, documents or even screen with their fellow participants. It has been designed to enable real time knowledge flow in all the categories of institutions such as, school, college and corporate organizations.
Its unique feature of getting integrated with other software makes it an easily acceptable and reliable product. Moreover, Congrea provides a safe platform to its users, as all the end to end communications are encrypted via SSL. Being an open source application, Congrea is highly customizable and can be modified according to the different requirements of the user. It’s a lightweight, browser based application and has no dependency on Flash. Also, Congrea’s cloud services are offered from twelve different locations across the globe.
Pre-requisitions
Network
An internet connection – broadband wired or wireless (3G or 4G/LTE). Minimum bandwidth is 600kbps (up/down) and recommended is 4 Mbps (up/down).
Hardware
Congrea has a very basic hardware requirement which includes,
- Quad core processor with minimum 4GB RAM
- Camera
- Microphone
*Note- If a person owns a system (e.g. Laptop) wherein the build in camera is either damaged or its picture quality needs to be enhanced then the person will have a choice to add in another external camera to the system which can be enabled in the settings section of Congrea.
The laptop should be in high-performance mode and not in power / battery saving mode. For good performance, avoid using non-essential programs / tabs at the time Congrea is running.
Software
Software requirements for Congrea includes,
- Latest version of modern browser (e.g. Google Chrome)
Understanding the UI
Before understanding the UI one must note that Congrea is meant for two type of users, i.e., presenter and learner. Presenter will be the person, having all the access over the different features of the application, However, learner will have limited access as well as different look and feel of the application.
Once you login to Congrea as a presenter, you will land to a page which will look exactly like the screenshot below.
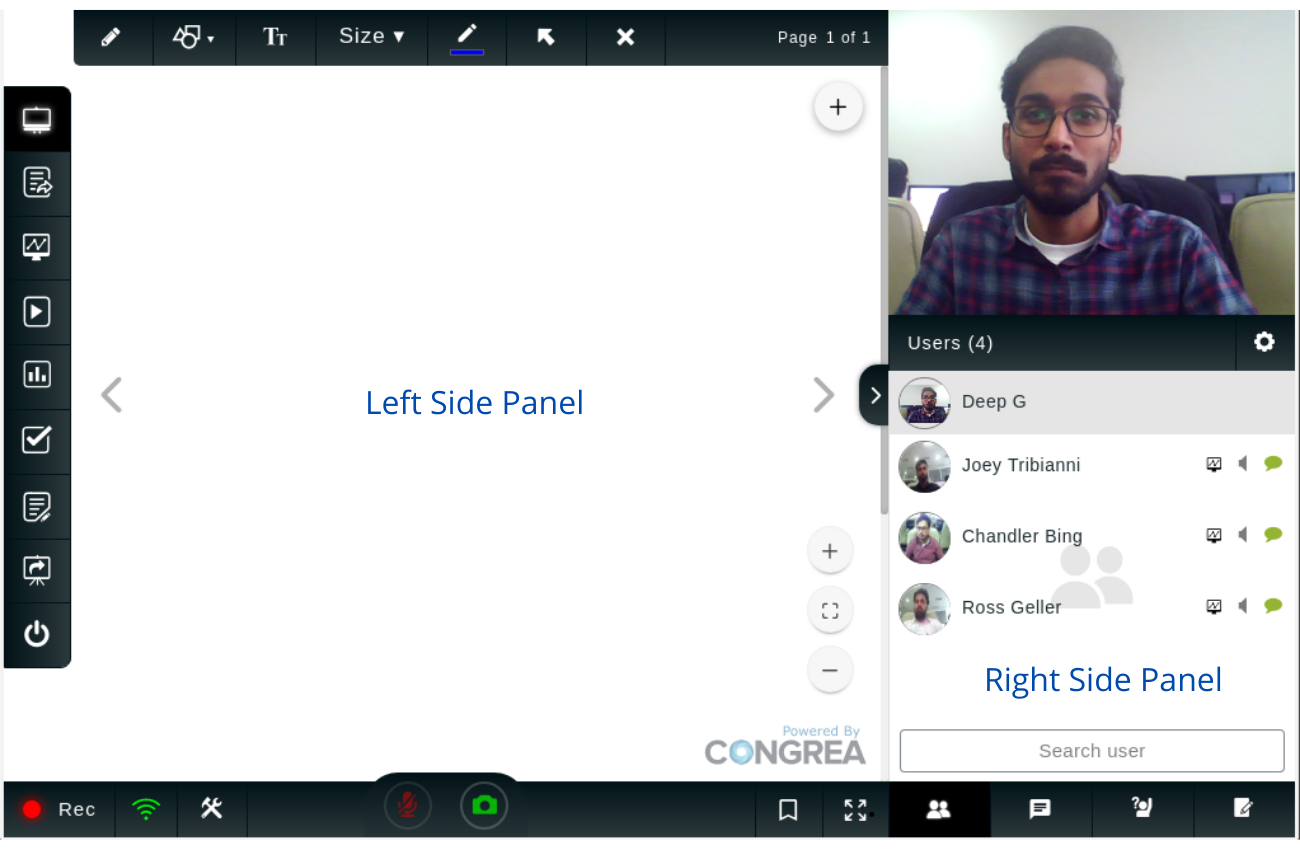
Right Side Panel

![]() User List
User List
![]() Common Chat
Common Chat
![]() Raise Question
Raise Question
![]() Add Notes
Add Notes
User List
Provides a quick list of all the participants who are present in the session
![]() User Settings: This button provides the teacher with control over the learners of the session, using this the teacher can enable or disable audio, video, common chat and several other features for the learners
User Settings: This button provides the teacher with control over the learners of the session, using this the teacher can enable or disable audio, video, common chat and several other features for the learners
 Request Screen Share: Click to ask any of your learner to share their screen with you. To share the same with other participants, click on Share to All present on the bottom left of your screen
 Mute Participant: Click to mute and unmute any of your participant
 Disable/Enable Chat: Click to disable or enable chat option for any of your participant
Common Chat
A common space to send and view messages of the classroom.
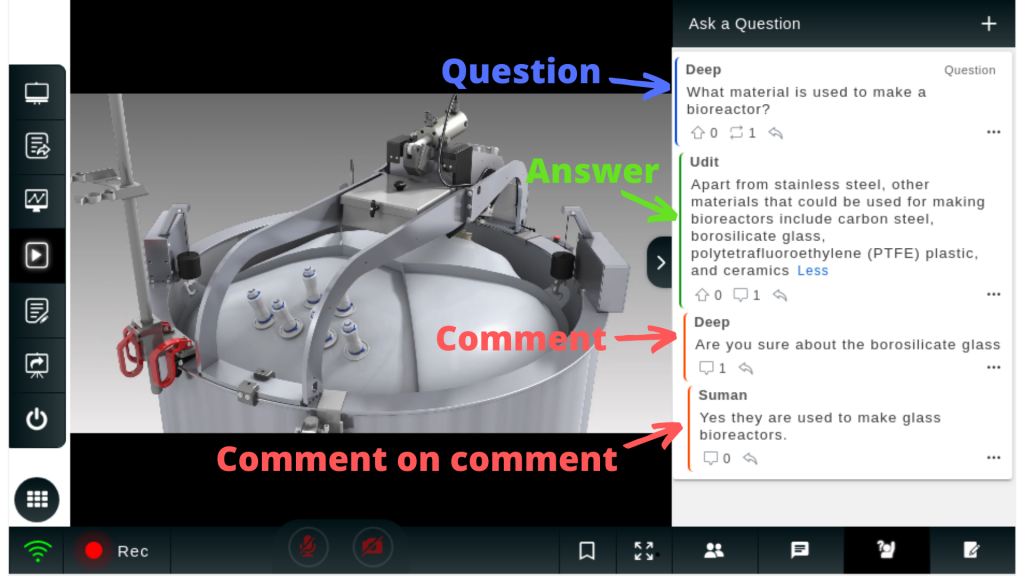
Ask Question
A space to ask and answer the questions during and after the session.
![]() Add Question
Add Question
![]() Upvote
Upvote
![]() Number of Answers
Number of Answers
![]() Reply
Reply
![]() More Options
More Options
![]() Number of Comments
Number of Comments
Add Notes
It provides the participants with a space to add private notes during and after the session.
Left Side Panel
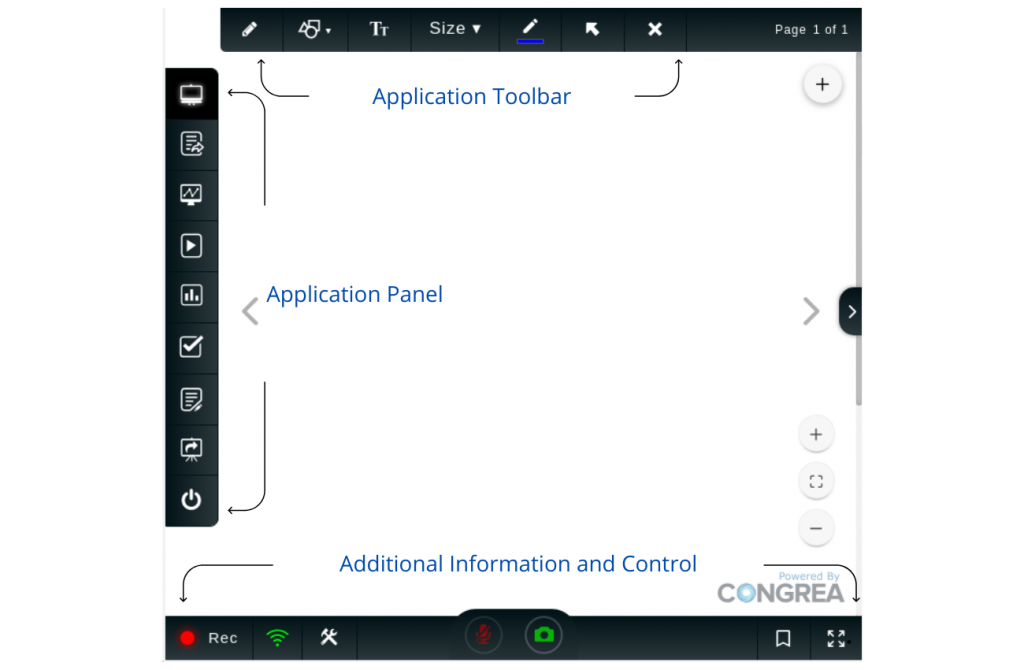
Applications Toolbar
This toolbar changes along with the application. For instance, the one shown in above picture is the toolbar for whiteboard
Application Panel
 Whiteboard : Click here to enable a virtual whiteboard
 Document sharing : Click here to enable document sharing during the classroom session
Screen share : Click here to enable the screen sharing
 Share video : Click to start sharing relevant youtube videos during the session
 Poll : Click here to start an online poll during the classroom session
 Quiz : Click to start an online quiz to have a quick assessment of the learners
 Text editor : Click on the text editor to start an online text editing session wherein, you also have an option to collaborate with the fellow learners
 Share presentation : Click here to share your online HTML5 presentation during the classroom session
 Session end : Click here to end the session
Additional Information and Control
![]() Recording Status: Red icon depicts recording is on whereas yellow denotes as off
Recording Status: Red icon depicts recording is on whereas yellow denotes as off
![]() Connection Strength: This icon aids in understanding the bandwidth of your network. The colour of this icon changes with the speed of your internet, wherein Green reflects good connectivity, Yellow means satisfactory, Orange means poor and Red denotes no connectivity
Connection Strength: This icon aids in understanding the bandwidth of your network. The colour of this icon changes with the speed of your internet, wherein Green reflects good connectivity, Yellow means satisfactory, Orange means poor and Red denotes no connectivity
![]() Validate system requirements: Click to check that all the system requirements (such as camera, microphone, internet etc) are working well
Validate system requirements: Click to check that all the system requirements (such as camera, microphone, internet etc) are working well
![]() Microphone: Click here to mute or unmute your sound
Microphone: Click here to mute or unmute your sound
![]() Camera: Click here to enable or disable your camera
Camera: Click here to enable or disable your camera
![]() Bookmark: Click to pin or bookmark a particular context during and after the session
Bookmark: Click to pin or bookmark a particular context during and after the session
![]() Full Screen: Click to view your Congrea’s screen on full screen mode
Full Screen: Click to view your Congrea’s screen on full screen mode
Additional Icons
 Dashboard : This icon is available during document, video and presentation sharing sessions which allows you to modify the shared files
Collaborate : Available in the text editor application, this icon enables your participants to have a collaborate session
Using Congrea
Whiteboard
Steps for using the whiteboard
- Click the whiteboard icon and use the application toolbar to select and draw the shapes as required.
- To replace, resize or realign any shape click the Active All option and select the shape or text you want to modify. Using the motion of your mouse, you can easily customize them. You can also use Active All button to select and delete any shape.
- Clear all button can be used to delete all the content on a whiteboard
- Use the arrow icon present on both the centre ends to use multiple whiteboards
Document Sharing
Steps of using document sharing
- Select document sharing from the applications panel and go to document dashboard to upload documents
- Click on Upload Documents to select the document from repository and click open to add the same to the dashboard
- On documents dashboard, left row shows the name of documents and right box displays different pages of a document
- The documents can be selected (tick) or deleted (Bin) and within a documents, the pages can be hidden (eye) or deleted (bin)
- Click on Finish to start sharing the document with participants. The toolbar can be used to annotate the document and the left (<) and right (>) arrows can be used to switch pages
- Zoom in, Zoom out, fit to screen and reload button can be used to manage the page view
Poll
Steps of using Poll
- Click on the Poll icon from the applications panel and you will see two different options (course poll and site poll) present on the upper left section of the screen. Click course poll to run a poll related to the course running in the classroom. Click site poll to run a general poll.
- After clicking any of these two option you can add your poll by clicking the Add New option, a new tab will get open which will say create new poll
- Now start adding the options of your poll in the Option section, to add more options you can simply click on the Add Option button
- To publish your poll click on the Publish option, a poll setting tab will open where you can modify the settings as per your requirement and then press publish to run your poll
- After the completion of poll the result will be shown in the graphical as well as in the text format
- To publish any of the Saved Polls, find the poll you want to run. You now have three choices under the control option, first option will allow you to edit the poll, second will delete the poll and third will publish the poll
Quiz
*Congrea along with other softwares (e.g. Moodle) allows you to run a quiz during a classroom session.
Steps of using Quiz
- Once you select the quiz option, it will direct you to the quiz dashboard where all the quizzes of the course that you have imported will be available to publish
- Choose the quiz you want to publish now click on the Publish option present below the “Controls” tab
- A new window will open, click publish quiz option present over it, you can now have the real time feed on how the participants are performing in the quiz
- You can also click on the grade report to check the performance of each of the participant
Text Editor
Steps of using text editor
- After clicking the text editor option, click on the Collaborate option (in case you want to have the participation of your learners) present on the bottom right of your screen
- For the selective collaboration simply click on the Write Mode option (present beside the name of each of the participant) of the learner that you wish to collaborate with
- You can now write anything over the text editor, you can also choose font, size, colour and alignment of the text using the application toolbar
- To add a picture just click on the Image icon present on the toolbar, add the URL and click submit to upload it
Chatroom or Private Chat
Both the presenter and learner have the option of having common as well as private chat with any of the member present during the classroom session. You can simply click on the Chatroom option present on the bottom right of your screen to start a common chat. Whereas, for the private chat you can click on the name of the participant that you want to have a discussion with. Here the presenter also have an authority to disable the chat of any of the participant/s just by clicking the option of disable chat present just beside the name of the participants.
Ask Question
It is a dedicated space for the queries of participants, wherein anyone can post questions related to the ongoing context during and after the session (recording), the same can be answered by anyone during and after the session.
*Ask question is not available during the poll and quiz feature of Congrea.
Functionalities
- Context linking – The question posted will be mapped with the ongoing context of the classroom. For instance, all the questions asked during page 1 of the whiteboard will be mapped with it and will be visible whenever the context shows up, during the session or while viewing the recording. Context in simpler words is the content that is being displayed on the screen, be it the pages of whiteboard, document; slides of a ppt; screen being shared, text editor or video.
- Upvote – To promote collaboration participants will get the functionality to upvote someone’s question as well as the answer.
- Comment – To encourage discussion participants can comment on the answers posted by others.
- Mark as answer – Teacher will get the functionality to mark any given answer as final which will in turn close that particular question i.e., no further answers can be posted on that question. However, participants can still post comments on the answers of that question. By default the answers posted by the teacher will be marked as final answers.
- View all questions – While viewing the recording the viewer can use this functionality to view all the questions in one go without mapping the context.
Notes
This feature provides the participants with a dedicated space to add their personal notes which gets linked with the ongoing context of the classroom. These notes can be added and viewed anytime during and after the session (recording).
Functionalities
- All the users will get a separate writing space in the right side panel once they click the notes icon
- This will allow them to add notes to a particular context
- For every context different notes can be generated and same will be reflected using the pagination, the total count of which will reflect the total number of notes being added
- User can easily navigate between the added notes in the live session as well
- Once a particular note has been cleared using the clear all button the total number of notes will also get reduced by 1
*Notes is not available for poll and quiz
Bookmark
Designed to enable the participants to pin any ongoing context of the session both during the live session and while viewing recording for their later reference.
Functionalities
- Anyone in the live session or recording can click this button present in the bottom panel to create a bookmark of a particular context for their later reference
- Bookmark icon will change the colour (from transparent to blue) once clicked
- Re-clicking the same would allow them to umark the bookmarked context
*Bookmark is not available for poll and quiz
Audio Visual Interaction
You can also have a basic audio visual interaction during the classroom session by enabling the microphone and camera by clicking on the respective icons.
Session Recording
Once the classroom session is over you can click on the close session icon after which the recording will get automatically saved.
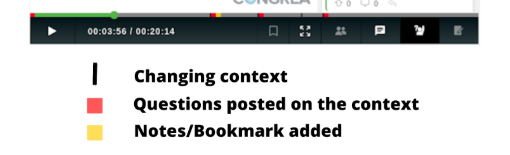
While viewing the recording the seek-bar will show different pins reflecting either changing context, question posted on raise question or notes or bookmark added by you. Refer below screenshot for better understanding.